Laser Cutting Practical
Week 4 🙆
This week, we had our laser cutting practical. 😀
We first had to create an SOP to operate the laser cutting machine. We first created the laser cutting SOP using the videos that were available on blackboard and also the deck of slides that were given to us. However, during the briefing that was given to us before the competency test, I realized that there were things that were missing from the SOP that we created.
Hence, to improve the SOP, I would include how to operate CoralDraw as part of the whole process of operating part the laser cutting machine. 🧠
For CoralDraw, we first have to create a new canvas, then we import the file that we want to laser cut, and it should be a DXF file if the file is from Fusion 360, but for the competency test, it was one of the test files that was already in CoralDraw. After importing the file, we then had to input the colors for the different purposes. Red for cutting and green for engraving, using the pre set color template on the right hand side of CoralDraw, and if it is not there, we can simply input the number 255 onto the color that we want, and 0 for the other colors that we do not want. We also had to choose the width as 'hairline' if it is not already done for us, and 'none' if we do not want to score anything. We have to also use the 'fill' function to fill the color green if we want to engrave any design. After we are done with putting in the respective colors, we can click Ctrl+P to print the design and follow the SOP that we have created before hand.
Another thing that we were taught that was not inside the SOP, that we can add to improve on was that we can open the lid of the laser cutting machine after it is done cutting and that we waited for a while for all the smoke to dissipate, and that we can hold on the material that we are cutting so that it does not move, and then we can press down on our design to see if it was fully cut through, and if it is not, we can press the green 'Go' button again to cut it another time to ensure that it is fully cut through.
😍This was what my competency test piece turned out to look like:

😅I'm actually rather proud of this as I had to take the competency test quite a number of times before I managed to do it properly as I was sent back to think about it and a chance to ask my fellow classmates as I didn't know where some of the stuff was on the CoralDraw application. One example would be that I couldn't find the fill button to fill in the part that I wanted to engrave.
Cutting Our Parametric Design 😉
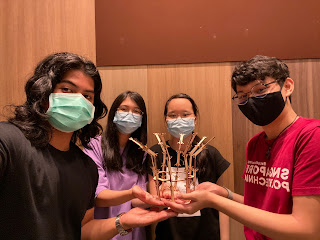
The main thing that we had to do was to design and cut our parametric design. What we had to do was to cut a construction kit that can be assembled in many different ways to form different things. The first thing that our group did was that we thought about what we wanted to create and then we expanded on it. We decided to create the iconic architecture, the Supertrees at Gardens By the Bay. Since we could only create it 50cmx50cm, we decided to create it about 30cm tall. We then went on and create the pieces that would allow us to create a Supertree and also be assembled into something else.
We used Fusion 360 to create the pieces and the export the design as a DXF file for laser cutting. We imported the file into CoralDraw and the did the necessary steps to print the design.
💬 This was how out parametric construction kit looked like during the cutting process:


However, not everything went according to plan. 😕
After cutting the first connector and the first structure, we found out that the slots do not fit, which means that the sloth width is too small. Hence, we had to change the sloth width on our parametric design on fusion, and this was another time where I was thankful for the 'Change parameters' function on Fusion 360, which made doing this a lot easier and faster.


We ended up having to do this a few times before we got it right. But when we did, the whole group was happy that we did after much trial and error, and we were finally able to cut out whole parametric kit.
👉👍 A short video on cutting most of our pieces:

Comments
Post a Comment