CAD, Computer Aided Design
Week 1
This week, we created a keychain using Fusion 360, also as a refresher on how to use Fusion 360 from the previous semester.
1. 💬 First is to create a sketch.
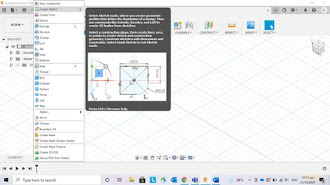
2. 💬 Next is to select a plane

3. 💬 Then to draw a 2 point rectangle of 65mm by 25 mm

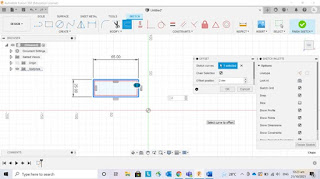
5. 💬 Fillet the sketch by 5mm on all four corners

6. 💬 Draw a line and place first point

7. 💬 Right click on the line and click on normal/construction

8. 💬 Define a 7mm distance between the line and the edge of the keychain

9. 💬 Put a point and draw a 5mm circle in diameter

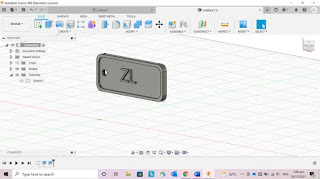
10. 💬 Select create text and type name into the keychain


👍 Finished product
Reflection for Keychain:
After going through this, it is a good refresher as to what we have done in the previous semester, with all the different functions as it has been quite a while since we used Fusion 360.
This week, we were tasked to create a handphone stand using Fusion 360 that can be laser cut and assembled, using parametric design.
1. 💬 First, I had to create a sketch

2. 💬 Then select a plane to start the sketch

3. 💬 Sketch a 100 mm by 80mm 2 point rectangle


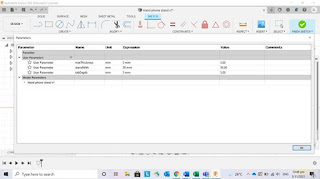
5. 💬 Using the change parameters under modify, put in the relative parameters that I want for my handphone stand.
6. 💬 Extrude the sketch according to the parameters

7. 💬 Finishing the previous sketch, and starting a new sketch, create three 3-point rectangles on the extruded piece and the length and width of the rectangles according to the parameters. These would be the tab slots.

8. 💬 Cut out the three rectangles that was cut.

9. 💬 Copy and paste the plane to get two sides, and the distance between the two planes would be according to the parameters that was set beforehand at 50mm.

10. 💬 Creating a new sketch, draw a 66mm by 10mm rectangle for the brace of the handphone stand

11. 💬 Then to create the tab slots, the length and the width according to the parameters that was set earlier and mirror accordingly to get the same on the other side.

12. 💬 After the sketch is done, extrude the piece

13. 💬 Fillet the sides of the brace


15. 💬 After all the above steps are done, the handphone stand is complete.

From this activity, I have learnt that not all designs of a handphone stand can be laser cut, and that I had to think of a design of a handphone stand that can be laser cut. I am also introduced to a new feature, which is the parameters. This feature is very helpful as all you have to do is to create one parameter and key in the parameters once, and of you have to change any of the parameters, it can be easily done so, without the need to change every single side. This would be helpful in the future when we are needed to do something similar, especially for our final year project.
Comments
Post a Comment